This website uses Cookies. Click Accept to agree to our website's cookie use as described in our Privacy Policy. Click Preferences to customize your cookie settings.
Turn on suggestions
Auto-suggest helps you quickly narrow down your search results by suggesting possible matches as you type.
Showing results for
- Google Cloud
- Articles & Information
- Cloud Product Articles
- Apigee CI/CD with GCP - Cloud Source repositories...
Topic Options
- Subscribe to RSS Feed
- Mark as New
- Mark as Read
- Bookmark
- Subscribe
- Printer Friendly Page
- Report Inappropriate Content

 LinkedIn
 Twitter
madhans
Staff
Topic Options
- Article History
- Subscribe to RSS Feed
- Mark as New
- Mark as Read
- Bookmark
- Subscribe
- Printer Friendly Page
- Report Inappropriate Content
5
3
4,923
Continuous Integration(CI) and Continuous Delivery(CD) of Apigee can be completely automated with GCP services and this article covers the design and instructions to set it up.
Prerequisite
|
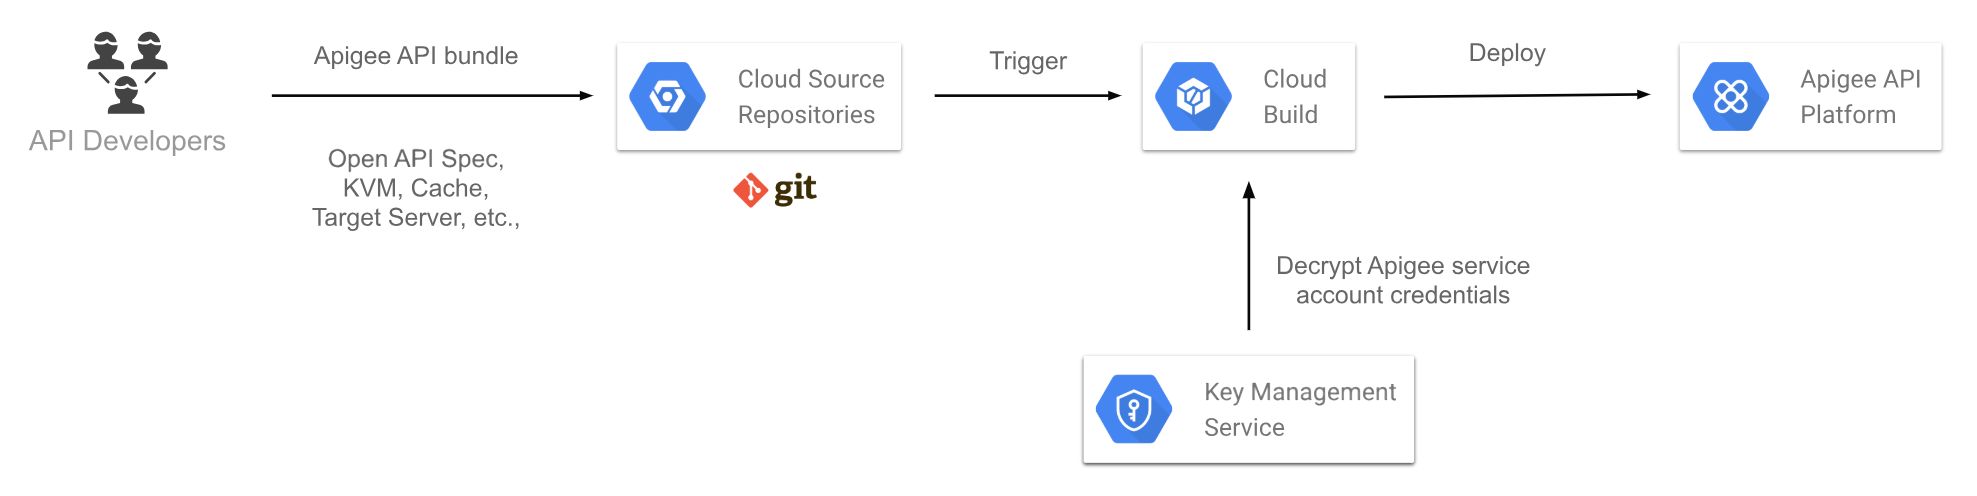
GCP provides a great assortment of PaaS services to automate build and deployment of wide variety of apps. The high level view of Apigee CI/CD using GCP services look as follows:

In addition to Apigee three GCP services are used here, their purpose and the corresponding Apigee action is described below.
GCP Cloud Source Repositories
Cloud hosted private git repositories in GCP provide a secure, fully featured collaboration and source control system for your team. [docs]
API developers create API bundles on Apigee and can version track it in Cloud Source Repositories. It is recommended to version control all Apigee entities like API bundles, Open API Specs, Target Servers KVM, Cache definition etc., so that Apigee APIs can be deployed to any Apigee org, env as necessary just by pointing the CI/CD tooling to the required Apigee org, env.
GCP Cloud Build
Continuously build, test and deploy on GCP. [docs]
Cloud Build can be configured to trigger a "build" based on branch or tag patterns in the connected git repository hosted in either Cloud Source Repositories, github or Bitbucket. A "build" can deploy one or many Apigee API proxies and associated config to Apigee.
GCP Cloud KMS
Cloud-hosted key management service to manage cryptographic keys. [docs]
An Apigee deployment requires an Apigee account and Cloud KMS provides the encryption service to securely manage and use Apigee account credentials. Cloud Build configuration can pull the necessary encryption keys from KMS during a build while providing necessary security in the build pipeline.
Setup
The instructions below enable you to automate deployment of a single API proxy bundle. A complex project with multiple API proxy bundles and the associated config can be accomplished by extending this setup.
Cloud Source Repository, Cloud Build and Cloud KMS services are natively integrated in GCP and hence setting up a CI/CD flow with GCP is effortless. Follow instructions below to perform this setup in your GCP project.
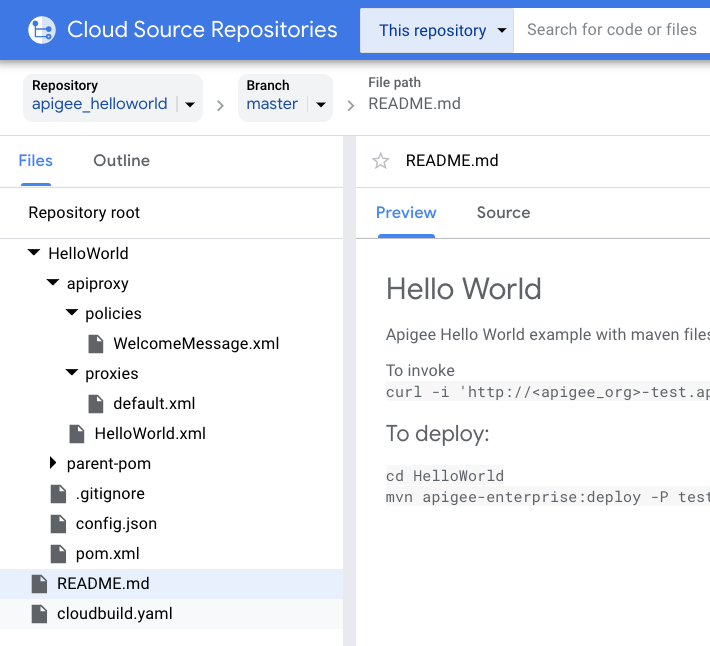
1. Setup Cloud Source Repositories
Login to GCP console, jump to your GCP project and create a Cloud Source Repository for your Apigee entities. Import an API bundle into the source repository. Any git client can be used to initialize the repository, add files and push the repository to GCP Source Repositories.
Beginners |

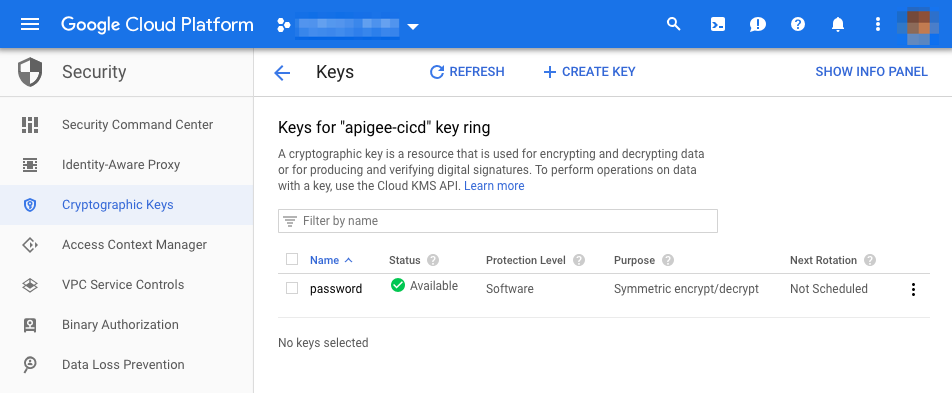
2. Setup Cloud KMS for Apigee service account credentials
Apigee deployment tools require an active Apigee account. The account password is placed in Cloud KMS as an encrypted secret to be subsequently used for deployment in the build job.
Follow instructions in the link below to manage your Apigee service account credentials in Cloud KMS
https://cloud.google.com/cloud-build/docs/securing-builds/use-encrypted-secrets-credentials

3. Setup Cloud Build
To create a "build" in Cloud Build we need a cloudconfig.yaml file in the source repository with the build and deployment instructions. Sample cloudconfig.yaml file for two of the tool options to perform Apigee deployment are provided below. Select one of the options below update to reflect your Apigee and GCP project details and add to your Source repository. IMPORTANT Apigee account password should not be placed in plain text anywhere in the repository or in the cloudconfig.yaml file.
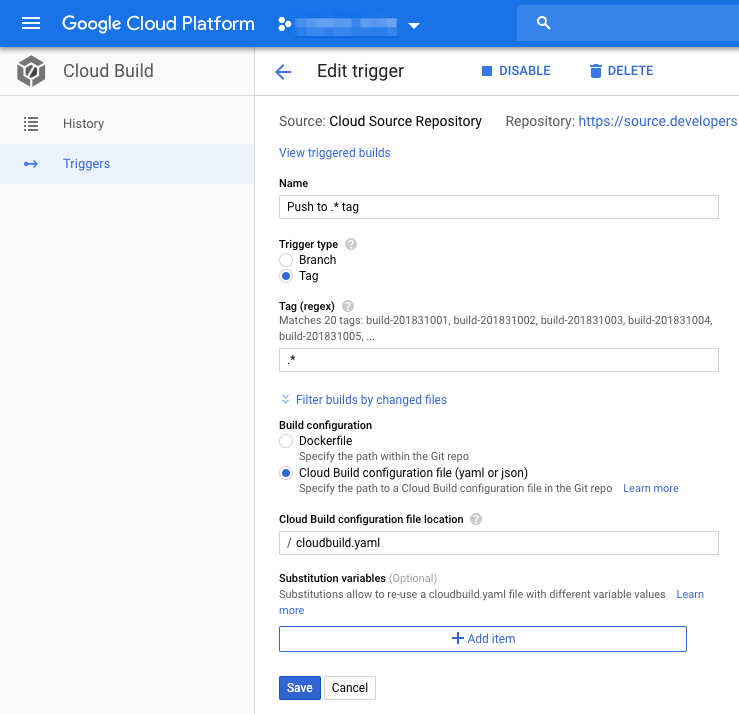
Once the cloudbuild.yaml file is created in the repo (either of the below options) create a build configuration with a "trigger" in Cloud Build. Refer to Cloud Build docs for instructions.
https://cloud.google.com/cloud-build/docs/how-to
Sample 1 - maven for deployments
cloudbuild.yaml
steps:
- name: 'gcr.io/cloud-builders/mvn'
  entrypoint: 'bash'
  args: ['-c', 'mvn install -Ptest -Dusername=apigee-deploy@example.com -Dpassword=$$PASSWORD']
  dir: 'HelloWorld'
  secretEnv: ['PASSWORD']


secrets:
- kmsKeyName: projects/entproject-29718/locations/global/keyRings/apigee-cicd/cryptoKeys/password
  secretEnv:
    PASSWORD: CiQA6HuVpO4QKkUoePuaVb0n5QFUtSJPirI1H4yL+q8m6ZCoY/UmRAAG/UrWDn6IvTwnPRG/UxbAsoMAWdsawWqvk3mDrB/mL
Sample 2 - apigeetool for deployments
cloudbuild.yaml
steps:
- name: 'gcr.io/cloud-builders/npm'
  entrypoint: 'bash'
  args: ['deploy_proxy.sh', 'test']
  id: 'Deploy test'
  secretEnv: ['PASSWORD', 'PRIVATE_KEY']
  env:
  - 'USERNAME=${_USERNAME}'
  - 'ORG=${_ORG}'
  - 'NAME=${_NAME}'
  - 'APIVERSION=${_APIVERSION}'
  - 'PROJECT=${_PROJECT}'
  - 'LOCATION=${_LOCATION}'

substitutions:
    _SERVICE_ACCOUNT: apigee-cloud-deploy@vpd-sw.iam.gserviceaccount.com
    _USERNAME: apigee-deploy@example.com
    _ORG: enterprise-example
    _NAME: ml
    _APIVERSION: v1beta1
    _PROJECT: vpd-sw
    _LOCATION: us-central1

secrets:
- kmsKeyName: projects/entproject-29718/locations/global/keyRings/apigee-cicd/cryptoKeys/password
  secretEnv:
    PASSWORD: CiQA6HuVpO4QKkUoePuaVb0n5QFUtSJPirI1H4yL+q8m6ZCoY/UmRAAG/UrWDn6IvTwnPRG/UxbAsoMAWdsawWqvk3mDrB/mL
deploy_proxy.sh
#!/bin/bash

npm install -g apigeetool

apigeetool deletekvmmap \
    -u $USERNAME \
    -p $PASSWORD \
    -o $ORG \
    -e $1 \
    -n $NAME \
    --mapName "secrets"

apigeetool createkvmmap \
    -u $USERNAME \
    -p $PASSWORD \
    -o $ORG \
    -e $1 \
    -n $NAME \
    --encrypted \
    --mapName "secrets"

apigeetool addEntryToKVM \
    -u $USERNAME \
    -p $PASSWORD \
    -o $ORG \
    -e $1 \
    -n $NAME \
    --mapName "secrets" \
    --entryName "service-account" \
    --entryValue "${SERVICE_ACCOUNT}"

apigeetool deployproxy \
    -u $USERNAME \
    -p $PASSWORD \
    -o $ORG \
    -e $1 \
    -n $NAME \
    -d .
A sample build trigger that is based on any new tags being pushed to the repository given below.

Build Report
Cloud Build automatically triggers builds when a new tag is pushed or when a branch is created in the git repository. In the Google Cloud Console you can see a list of all builds including the build log.

Read More
- git repo structure and branching strategy for Apigee
https://community.apigee.com/articles/34868/source-control-for-api-proxy-development.html - Organization of repository for large Apigee setup
https://github.com/apigee/apigee-config-maven-plugin/wiki/Organize-config-in-a-large-project
[Thanks to Daniel Clarke for attempting this pattern and sharing it with me]
Topic Labels
Comments
kurtkanaskie
Staff
- Mark as Read
- Mark as New
- Bookmark
- Permalink
- Report Inappropriate Content
10-18-2019
12:09 PM
Great article @Madhan+Sadasivam, this got me going quickly!
It took me awhile to get npm and node working, so maybe this will help others.
First I modified my package.json to support scripts:
"scripts": {
    "apigeelint": "node ./node_modules/apigeelint/cli.js -s ./apiproxy -f table",
    "unit": "node ./node_modules/mocha/bin/mocha test/unit",
    "integration": "node ./node_modules/cucumber/bin/cucumber.js target/test/integration/features"
  }
Then I used the "frontend-maven-plugin" to install npm and node to run steps that use node.
In my pom.xml I used:
plugin>
	<groupId>com.github.eirslett</groupId>
	<artifactId>frontend-maven-plugin</artifactId>
	<version>1.8.0</version>
	<!-- NOTE:
		put the node executable in targetnode,
		otherwise it defaults to node and
		deploy plugin thinks its a node.js proxy
	-->
	<configuration>
		<installDirectory>targetnode</installDirectory>
	</configuration>
	<executions>
		<execution>
			<id>install node and npm</id>
			<phase>validate</phase>
			<goals>
				<goal>install-node-and-npm</goal>
			</goals>
			<configuration>
				<nodeVersion>v8.4.0</nodeVersion>
			</configuration>
		</execution>
		<execution>
			<id>npm install</id>
			<phase>validate</phase>
			<goals>
				<goal>npm</goal>
			</goals>
			<configuration>
				<arguments>install</arguments>
			</configuration>
		</execution>
		<execution>
			<id>apigeelint</id>
			<phase>validate</phase>
			<goals>
				<goal>npm</goal>
			</goals>
			<configuration>
				<arguments>run apigeelint</arguments>
			</configuration>
		</exec
...
Hope that helps.
funrockerz

Bronze 1
- Mark as Read
- Mark as New
- Bookmark
- Permalink
- Report Inappropriate Content
03-30-2023
03:46 AM
Hi @madhans for setup repo step 1, the given repo link has different file structure and some different files with respect to shared screenshot
funrockerz
Bronze 1
- Mark as Read
- Mark as New
- Bookmark
- Permalink
- Report Inappropriate Content
03-30-2023
04:21 AM
Hi @madhans Any idea why im getting this error

I have a repo created same as - https://github.com/GoogleCloudPlatform/apigee-samples/tree/main/deploy-apigee-proxy in google cloud repo im trying to

Following is cloudbuild.yaml code
https://github.com/GoogleCloudPlatform/apigee-samples/blob/main/deploy-apigee-config/cloudbuild.yaml