- Google Cloud
- Articles & Information
- Cloud Product Articles
- HashiCorp Vault Facade as Apigee Proxy: JWT Signat...
- Subscribe to RSS Feed
- Mark as New
- Mark as Read
- Bookmark
- Subscribe
- Printer Friendly Page
- Report Inappropriate Content
- Article History
- Subscribe to RSS Feed
- Mark as New
- Mark as Read
- Bookmark
- Subscribe
- Printer Friendly Page
- Report Inappropriate Content
Externalising and securing JWT signing process for external API clients
Just because you're paranoid doesn't mean they aren't after you.
― Joseph Heller, Catch-22
Every security-related decision is a compromise between convenience, performance, and security.
Nowadays, just being within an organisation's intranet is not sufficient enough to consider your important data protected. Internal threats are a serious issue and Zero Trust security approach is a norm.
There are different ways to store and keep information in Apigee. They are KVMs (which are encrypted by default), Kubernetes Secrets, Properties. The more sensitive information is, the more secure arrangement you have to apply for your information.
One of the most important examples of information you'd want to protect is a PKI private key that you use to sign JWT id tokens.
Apigee KVM allows you to secure an access to your KVM via RBAC from an external, but there is no ability to protect the KVM entry value from a proxy.
The only way is to not to store your private key in Apigee but to use a specialised solution like HSM. The next best thing is a software equivalent of HSM
It is important to realise that it's not sufficient to just store a key in secure storage. If you fetch it to memory or in case of Apigee, in the proxy context, it could be compromised there. The signing operation itself also needs to be externalised. This requirement led to an advent of a new *aaS acronyM: EaaS, Encryption as a Service. Many tools implement EaaS. Many clouds do so too.
In this article we are going to use the HashiCorp Vault Transit Engine EaaS solution.
Audience
Working with Apigee means to be in the world of polyglot programming. In this case, we need some cryptography, java programming skills, basic vault mastery, Apigee DSL knowledge, and linux and CI/CD know-how. We need many technologies to come up with a complete solution. While we hope you, Reader, are comfortable with all of them equally, this article, being a primer, does not assume that.
Chapters
In this article we will implement a JWT signature Use Case. According to our User Case requirements, we need to implement a login API that accepts user credentials, username and password, via an HTML form POSTed to the /login endpoint. It returns an ID JWT Token. Another requirement is to expose a /jwks endpoint that will return a current collection of active public keys in an JWK format with their respective kids.
To acquire a solid practical experience, we will
- install HashiCorp Vault server;
- enable Transit Engine and will sign and validate a JSON datagram using command line utility;
- we will repeat same steps, but using Vault RESTful interface;
- afterwards we will implement and deploy an Apigee proxy that uses previous API invocations;
- finally we will tour through the project repository that implements CI/CD pipeline for our use case and uses mock Vault server as well as BDD integration tests.
You can skip sections as appropriate.
Demo setup
The following diagram shows the demo setup we are going to use to study the Vault/Apigee integration.
All the administration is done from a jump box. We assume usage of private networking, RFC 1918 address space.
HashiCorp Vault is installed on a separate VM in the project. The configured Transit Engine provides sing operation as well as key management. As we want to lock a private key, the key is configured as being non-exportable.
An Apigee instance hosts an API proxy, called vault-facade. This proxy uses a java callout to provide an access to two operations, base64url-encode encoding. and pem-to-jwks public keys transformation. Apigee doesn't provide base64 url encoding out-of-the-box. The callout plugs this gap.
The VaultServer apigee's target server object defines Vault instance server configuration. To illustrate proper CI/CD Best Practices, we define this target server for either mocked Vault server configuration for our CI/CD pipeline or demo configuration that uses real Vault deployment, as per diagram.
The code is hosted at apigee/devrel repository.
Client application accesses to exposed endpoints: /jwks and /login.
The /login endpoint provides a typical operation that returns an ID Token in exchange for client credentials. The /jwks endpoint exposes a collection of JWK objects that are the public keys a client can use to verify generated ID token. In case of OpenID Connect, the jwks endpoint will be configured as the jwks_uri property value of the .well-known/openid-configuration resource.

Install Vault
Installing Vault
This is not a tutorial on Vault server installation, still we would like to provide a minimalistic yet complete guidance on how to install Vault and configure Transit Engine for an end-to-end experience.
We are going to follow this getting started document: https://learn.hashicorp.com/tutorials/vault/getting-started-install. Use it for additional information.
SECURITY-NOTE: Good security habits: don't host a Vault server on a VM with a public IP address even for non-production experiments.
1. Create a GCP VM to host a demo Vault Server
gcloud compute instances create demo-vault-server --zone=$ZONE --no-address2. Install some utilities which might be absent OOTB on this VM:
sudo apt install -y wget

sudo apt install -y jq

sudo apt install -y git

sudo apt install -y maven

sudo apt install -y libxml2-utils
3. Install HashiCorp Vault while verifyng integrity of the distribution files.
sudo apt update && sudo apt install gpg

wget -O- https://apt.releases.hashicorp.com/gpg | gpg --dearmor | sudo tee /usr/share/keyrings/hashicorp-archive-keyring.gpg >/dev/null

gpg --no-default-keyring --keyring /usr/share/keyrings/hashicorp-archive-keyring.gpg --fingerprint

echo "deb [signed-by=/usr/share/keyrings/hashicorp-archive-keyring.gpg] https://apt.releases.hashicorp.com $(lsb_release -cs) main" | sudo tee /etc/apt/sources.list.d/hashicorp.list

sudo apt update && sudo apt install vault
4 Verify installation by executing vault version command
vault --version
Output:
Vault v1.12.2 (415e1fe3118eebd5df6cb60d13defdc01aa17b03), built 2022-11-23T12:53:46Z
5. INSECURE OPERATION MODE! At this point of time, your Vault server is configured as a system service with TLS certificates turned on. The configuration file is located in /etc/vault.d directory. For the purpose of this demo's simplification, we are going to reconfigure it into an http mode.
sudo vi /etc/vault.d/vault.hclUncomment HTTP listener and comment HTTPS sections as follows:
# HTTP listener
listener "tcp" {
  address = "127.0.0.1:8200"
  tls_disable = 1
}

# HTTPS listener
#listener "tcp" {
#  address       = "0.0.0.0:8200"
#  tls_cert_file = "/opt/vault/tls/tls.crt"
#  tls_key_file  = "/opt/vault/tls/tls.key"
#}
6. Start vault as a system service and verify its status
sudo systemctl start vault.service
sudo systemctl status vault.service
NOTE: Verify connectivity to Vault server from your Apigee cluster. If needed, configure a firewall rule to allow vault traffic for port 8200.
7. To interact with Vault server, we need to configure VAULT_ADDR and VAULT_TOKEN variables
export VAULT_ADDR=http://127.0.0.1:82008. Verify vault status. It should be in a sealed state.
vault statusSample output at this moment:
Key                Value
---                -----
Seal Type          shamir
Initialized        false
Sealed             true
Total Shares       0
Threshold          0
Unseal Progress    0/0
Unseal Nonce       n/a
Version            1.12.2
Build Date         2022-11-23T12:53:46Z
Storage Type       file
HA Enabled         false
Deploy Vault: Starting the server
1. Initialise Vault server. Make a note for unseal keys and the root token.
vault operator initSample mutilated output:
Unseal Key 1: VR4uRa...TkPkQU
Unseal Key 2: t+7IVYe..JGOL0zq
Unseal Key 3: wEB5bhn...fYDXo
Unseal Key 4: INXqlsa...WNfzrW
Unseal Key 5: NpzlqdbT..H5RH

Initial Root Token: hvs.hZjrff...Ut3M
Deploy Vault: unseal
1. Repeat the unseal command three times with three different keys.
vault operator unseal2. Login into the server using an initial root token
vault loginSample output:
Token (will be hidden):
Success! You are now authenticated. The token information displayed below
is already stored in the token helper. You do NOT need to run "vault login"
again. Future Vault requests will automatically use this token.

Key                  Value
---                  -----
token                hvs.hZjrf...t3M
token_accessor       NUzk...cydsc
token_duration       ∞
token_renewable      false
token_policies       ["root"]
identity_policies    []
policies             ["root"]
Vault JWT Signing: CLI walkthrough
Let's configure Vault's Transit Engine and execute commands to sign and verify our JSON object.
WARNING: While signing and validating signatures of JSON objects, it is important to note that "StringOrURI values are compared as case-sensitive strings with no transformations or canonicalizations applied."
USAGE NOTE: https://tools.ietf.org/html/rfc7519#page-13
"Note that whitespace is explicitly allowed in the representation and no canonicalization need be performed before encoding."
1. Enable transit engine
vault secrets enable transitOutput:
Success! Enabled the transit secrets engine at: transit/
1. Create a signing key
vault write transit/keys/sign-key exportable=true type=ecdsa-p256 SECURITY-NOTE: Don't use exportable=true option for production. We use it only for this CLI walkthrough for educational demonstration to illustrate a deep dive into EC public key cryptography.
Output:
Success! Data written to: transit/keys/sign-key
2. Read the public key of created sign key
vault read -format=json transit/keys/sign-keyOutput:
{
  "request_id": "56c08875-de21-6140-040e-961fd8b431c9",
  "lease_id": "",
  "lease_duration": 0,
  "renewable": false,
  "data": {
    "allow_plaintext_backup": false,
    "auto_rotate_period": 0,
    "deletion_allowed": false,
    "derived": false,
    "exportable": true,
    "imported_key": false,
    "keys": {
      "1": {
        "creation_time": "2022-12-30T12:49:56.271880354Z",
        "name": "P-256",
        "public_key": "-----BEGIN PUBLIC KEY-----\nMFkwEwYHKo...DGPZoWd9eCxTuQ==\n-----END PUBLIC KEY-----\n"
      }
    },
    "latest_version": 1,
    "min_available_version": 0,
    "min_decryption_version": 1,
    "min_encryption_version": 0,
    "name": "sign-key",
    "supports_decryption": false,
    "supports_derivation": false,
    "supports_encryption": false,
    "supports_signing": true,
    "type": "ecdsa-p256"
  },
  "warnings": null
}
The whole collection of the public keys is returned, even if currently it contains only 1 key. The public key is provided in a PEM format.
The key index is 1. We are going to use it as a kid value.
3. Let's save the public key itself to the session's environment variable so we can experiment with it
KEY_PUBLIC_PEM=$(vault read -format=json transit/keys/sign-key | jq -r '.data.keys."1".public_key')4. Verify the public key contents
echo "$KEY_PUBLIC_PEM"Sample garbled output:
-----BEGIN PUBLIC KEY-----
MFkwEw...HuwdqI++rq
LNSKd..9eCxTuQ==
-----END PUBLIC KEY-----
5. Define sample header and payload JSON that complies with https://www.rfc-editor.org/rfc/rfc7515
HEADER='{"kid":"key:1","alg": "ES256","typ": "JWT"}'

PAYLOAD='{"sub": "1234567890", "aud": "urn://c60511c0-12a2-473c-80fd-42528eb65a6a", "iss":"https://35-201-121-246.nip.io"}'
To follow the specification, we need to encode the header and payload elements into base64url and catenate the values: base64UrlEncode(header) + "." + base64UrlEncode(payload).
Define the helper function in our current session:
function base64url () {  echo -n $1 | base64 -w0 | tr '+/' '-_' | tr -d '='; }

export base64url
6. Calculate the encoded values
JWS_HEADER=$(base64url "$HEADER")

JWS_PAYLOAD=$(base64url "$PAYLOAD")
7. Execute the sign operation by calling the Vault Transit engine's sign operation with sign-key as a key and encoded header and payload catenated string as an input argument.
vault write -format=json transit/sign/sign-key input=$(base64url "$JWS_HEADER.$JWS_PAYLOAD" ) marshaling_algorithm=jwsSample output:
{
  "request_id": "858acdf2-f5ab-0d18-aca1-8c45231719a4",
  "lease_id": "",
  "lease_duration": 0,
  "renewable": false,
  "data": {
    "key_version": 1,
    "signature": "vault:v1:kr8iq5II1DVNTNOaqJBr...rO2ncV9mGxQ"
  },
  "warnings": null
}
8. Let's do it again, but this time capture the output and extract the signature value.
JWS_SIGNATURE=$(vault write -format=json transit/sign/sign-key input=$(base64url "$JWS_HEADER.$JWS_PAYLOAD" ) marshaling_algorithm=jws | jq -r .data.signature | cut -d ":" -f3)9. Finally, let's display the assembled generated JWT value
JWT="$JWS_HEADER.$JWS_PAYLOAD.$JWS_SIGNATURE"
echo $JWT
Sample curated output:
eyJraWQiOiJrZXk6<snip>CI6ICJKV1QifQ.eyJzdWIiOiA<snip>bmlwLmlvIn0.be8sO0YK<snip>MNVbwzlMArcQ0hg
Observe 2 dot characters that separate 3 parts of the JTW token.
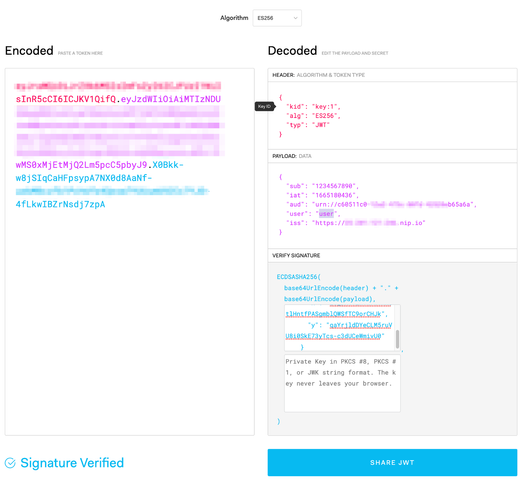
10. Verify in jwt.io with public key by posting the JWT token and the public key in the PEM format into Encoded JWT and Verify Signature Public Key text fields.
SIDEBAR: Public Key Conversion from PEM to JWK
As it is, we cannot use the public key generated by Vault as exposed in the format of a PEM file for our Use Case. We need to publish it in JWK format as JWKS.
For this we will use an excellent library called Nimbus JOSE + JWT, https://connect2id.com/products/nimbus-jose-jwt. A function JWK.parseFromPEMEncodedObjects(publicKey) does exactly what we need.
There is no magic in what it does, though. Some cool maths, but no magic. Let's dig deeper and follow what happens under the hood.
1. Our example, throw-away public key in the PEM format is:
echo "$KEY_PUBLIC_PEM"-----BEGIN PUBLIC KEY-----
MFkwEwYHKoZIzj0CAQYIKoZIzj0DAQcDQgAEK5crDMSZFvfs3JXcMcHuwdqI++rq
LNSKd3HrlhoUvYsYrmLv1uoU0WzQe9awBOdD2SVnSF22DGPZoWd9eCxTuQ==
-----END PUBLIC KEY-----
2. Using openssl utility, show the public key's PEM contents
echo "$KEY_PUBLIC_PEM"|openssl ec -pubin -noout -text -conv_form uncompressedOutput:
read EC key
Public-Key: (256 bit)
pub:
    04:2b:97:2b:0c:c4:99:16:f7:ec:dc:95:dc:31:c1:
    ee:c1:da:88:fb:ea:ea:2c:d4:8a:77:71:eb:96:1a:
    14:bd:8b:18:ae:62:ef:d6:ea:14:d1:6c:d0:7b:d6:
    b0:04:e7:43:d9:25:67:48:5d:b6:0c:63:d9:a1:67:
    7d:78:2c:53:b9
ASN1 OID: prime256v1
NIST CURVE: P-256
We can see that the key is an Elliptic Key, defined according to the NIST P-246 specification (https://nvlpubs.nist.gov/nistpubs/FIPS/NIST.FIPS.186-4.pdf, p100).
In an elliptic curve cryptography (with curve P-256), a public key is an X, Y coordinate on the cartesian plane and finite field over which the curve is defined. That is the pub field.
Its first byte, 0x04, is the identifier of the uncompressed presentation. What follows are the X and Y coordinates with length of 256 bits (32 bytes) one right after the other in a big endian integer, https://en.wikipedia.org/wiki/Endianness.
Thus, byte-by-byte re-layouted for a better representation:
0
04

1  2  3  4  5  6  7  8  9  10 11 12 13 14 15 16 17 18 19 20 21 22 23 24 25 26 27 28 29 30 31 32
2b:97:2b:0c:c4:99:16:f7:ec:dc:95:dc:31:c1:ee:c1:da:88:fb:ea:ea:2c:d4:8a:77:71:eb:96:1a:14:bd:8b:

18:ae:62:ef:d6:ea:14:d1:6c:d0:7b:d6:b0:04:e7:43:d9:25:67:48:5d:b6:0c:63:d9:a1:67:7d:78:2c:53:b9
3. Store the public key contents representation in an environment variable.
EC_PUB=$(echo "$KEY_PUBLIC_PEM"|openssl ec -pubin -noout -text -conv_form uncompressed)4. Extract PUB byte array to a PUB variable
PUB=$(echo "$EC_PUB"|awk '/^    /')
echo "$PUB"
Output:
    04:2b:97:2b:0c:c4:99:16:f7:ec:dc:95:dc:31:c1:
    ee:c1:da:88:fb:ea:ea:2c:d4:8a:77:71:eb:96:1a:
    14:bd:8b:18:ae:62:ef:d6:ea:14:d1:6c:d0:7b:d6:
    b0:04:e7:43:d9:25:67:48:5d:b6:0c:63:d9:a1:67:
    7d:78:2c:53:b9
5. Extract the X and Y values to their hex representations
X_HEX=$(echo "$PUB"| tr -d ':\n '|cut -c 3-66)
Y_HEX=$(echo "$PUB"| tr -d ':\n '|cut -c 67-)

echo $X_HEX
2b972b0cc49916f7ecdc95dc31c1eec1da88fbeaea2cd48a7771eb961a14bd8b
echo $Y_HEX18ae62efd6ea14d16cd07bd6b004e743d92567485db60c63d9a1677d782c53b9
6. The X,Y values are encoded with base64, its URL safe variant.
X=$(base64url $(echo -n "$X_HEX"|xxd -p -r))
Y=$(base64url $(echo -n "$Y_HEX"|xxd -p -r))

echo $X
K5crDMSZFvfs3JXcMcHuwdqI--rqLNSKd3HrlhoUvYs
echo $YGK5i79bqFNFs0HvWsATnQ9klZ0hdtgxj2aFnfXgsU7k
7. Format the JWK JSON object using obtained values
JWK=$( cat <<EOF
{"kty":"EC","crv":"P-256","x":"$X","y":"$Y"}
EOF
)

echo "$JWK"|jq
Output:
{
  "kty": "EC",
  "crv": "P-256",
  "x": "K5crDMSZFvfs3JXcMcHuwdqI--rqLNSKd3HrlhoUvYs",
  "y": "GK5i79bqFNFs0HvWsATnQ9klZ0hdtgxj2aFnfXgsU7k"
}
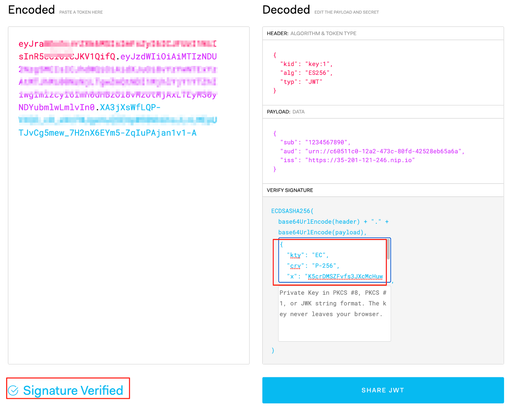
8. Validate that the public key in the JWK format is the correct one at jwt.io, by using the JWT token and a JWK key we obtained:
Vault JWT Signing: RESTful API
As vault CLI utility is a wrapper around Vault's RESTful API, we can execute both operations using curl or any other http request client.
1. the curl request to Vault API to read the public keys collection
curl -H "X-Vault-Token: $VAULT_TOKEN" "$VAULT_ADDR/v1/transit/keys/sign-key"Output:
{
  "request_id": "9dd9862b-7207-4b6b-e15f-ea86fd3a323f",
  "lease_id": "",
  "renewable": false,
  "lease_duration": 0,
  "data": {
    "allow_plaintext_backup": false,
    "auto_rotate_period": 0,
    "deletion_allowed": false,
    "derived": false,
    "exportable": true,
    "imported_key": false,
    "keys": {
      "1": {
        "creation_time": "2022-12-30T12:49:56.271880354Z",
        "name": "P-256",
        "public_key": "-----BEGIN PUBLIC KEY-----\nMFkwEwYHKoZIzj0CAQY...
<snip>
2. the curl request to Vault API to sign a token looks like:
curl -H "X-Vault-Token: $VAULT_TOKEN" \
    "$VAULT_ADDR/v1/transit/sign/sign-key" \
    -d @- << EOF
{"hash_algorithm":"sha2-256","marshaling_algorithm":"jws","input":"$(base64url "$JWS_HEADER.$JWS_PAYLOAD")"}
EOF
Output:
{
  "request_id": "22524e24-6588-796c-b681-c47665e47d75",
  "lease_id": "",
  "renewable": false,
  "lease_duration": 0,
  "data": {
    "key_version": 1,
    "signature": "vault:v1:aAGS....5kVa3v1M1X_w"
  },
  "wrap_info": null,
  "warnings": null,
  "auth": null
}
Vault Facade Proxy: Vault Keys to JWKS Proxy
It's time to revisit our solution diagram and deploy and tour the Apigee proxy that implements this integration.
All the necessary code is located in the apigee/devrel github repository,
https://github.com/yuriylesyuk/devrel.
[CLARIFICATION: right now, the code is in the RP to the devrel. After officially approved by maintainers and PR accepted, the link here will be updated]
To deploy the Apigee part of the demo setup, you can set up some environment variables and invoke a pipeline.sh script. Saying that, as we want to revisit the moving parts of the solution, we are going to do it manually, using sackmesser utility. As we are going to clone the whole devrel monorepo, the sackmesser is automatically available.
1. Clone the code
cd ~
git clone https://github.com/yuriylesyuk/devrel
export REPO=~/devrel/references/hashicorp-vault-integration
2. Add sackmesser bin folder to the PATH variable
export PATH="$REPO/../../tools/apigee-sackmesser/bin:$PATH"3. Login into an account that has Apigee Admin privileges
gcloud auth loginVault Facade Proxy: VaultConfig KVM and VaultServer Target Server
sackmesser is a wrapper over apigee maven config and deploy plugins.
This means that to create a TargetServer object and KVM with entries, we need to prepare a JSON config file that sackmesser will process. One of the ways to provision resources using sackmesser is to create a file called edge.json in a folder passed to the sackmesser via -d option.
Solution repository already contains a template file that is suitable for our purposes.
1. Inspect the template for creating Apigee configuration objects:
less $REPO/vault-facade-config/edge.json.tpl{
"version": "1.0",
"envConfig": {
"$APIGEE_X_ENV": {
"targetServers": [
{
"name": "VaultServer",
"host": "$VAULT_HOSTNAME",
"port": $VAULT_PORT,
"isEnabled": true,
$VAULT_SSL_INFO
"protocol": "HTTP"
}
],
"kvms": [
{
"name": "vault-config",
"encrypted": "true",
"entry": [
{
"name": "vault-token",
"value": "$VAULT_TOKEN"
}
]
}
]
}
}
}
As we can see, the config file defines a KVM vault-config that has a vault-token entry with value $VAULT_TOKEN.
It also defines a target server called VaultServer in the environment $APIGEE_X_ENV. The interesting property is a $VAULT_SSL_INFO variable value. Unfortunately, Apigee incorrectly interprets sSLInfo.enabled property [b/238153419]. Even if it is false, the target connection is still treated as SSL-enabled for an http server. As a workaround, for our HTTP configuration, we need to inject or omit the whole sSLInfo{} object.
2. It is a good security practice to have a separate token with a specific time to live when interacting with Vault, especially when using shared environments like Apigee.
PRODUCTISATION-NOTE: It's good [practice], but not the best [one]. The base one is to add proper authentication between the Vault and your platform. See part 2 of this article.
SECURITY-NOTE: For production, implement GCP IAM integration when operating at Google Cloud or equivalent for other clouds or on-prem.
vault token create -ttl=24hKey Value
--- -----
token hvs.TByFVQDA...FbzLKpA
token_accessor 49ksbaAzv...B2SpdAl
token_duration 24h
token_renewable true
token_policies ["root"]
identity_policies []
policies ["root"]
NOTE: To revoke a token:
vault token revoke <token>
3. Define parameters of VaultConfig KVM VaultToken entry
export VAULT_TOKEN=<vault-token>
4. Define parameters of Target Server for our Vault Server backend
export APIGEE_X_HOSTNAME=<apigee-env-group-hostname>

export VAULT_HOSTNAME=<vault-server-hostname>
export VAULT_PORT=8200
export VAULT_SSL_INFO=''

export APIGEE_X_ORG=<apigee-org>
export APIGEE_X_ENV=<apigee-env>
5. Create a KVM and a Target Server JSON datagram that holds Vault configuration
envsubst < "$REPO/vault-facade-config/edge.json.tpl" > "$REPO/vault-facade-config/edge.json"6. Create TargetServer target object and VaultConfig KVM
sackmesser deploy --googleapi -o "$APIGEE_X_ORG" -e "$APIGEE_X_ENV" -t "$TOKEN" -d "$SCRIPTPATH/$VAULT_CONFIG"Vault Facade Proxy: Java Callout
Make sure you're in the hashicorp-vault-integration directory of the devrel repository
SECURITY-NOTE: It is a poor security practice to keep binaries of any kind in your source repositories. That is why we are building the callout jar file prior to the proxy's deployment.
1. Install apigee runtime dependencies. Those are expressions-1.0.0.jar and message-flow-1.0.0.jar files.
Auxiliary script apigee-lib-install.sh uses a /tmp directory, provided as an argument, as a temporary storage for jar files. It then uses the mvn install command to install the jars into a local maven repository (~/.m2/repository/).
$REPO/apigee-lib-install.sh /tmp2. Inspect the VaultKeysToJwks class.
less $REPO/vault-facade-callout/src/main/java/com/exco/vaultkeystojwks/VaultKeysToJwks.java The VaultKeysToJwks.base64UrlEncode() method is a trivial yet important fix for current omission in the Apigee templating set of operations. Apigee can do basic bas64 encoding/decoding yet for many use cases, we need the safe url encoding.
The VaultKeysToJwks.getJwks() method iterates over PEM formatted public certificates that Vault Transit engine returns and converts them into canonical JWKS format using the intelligence of com.nimbusds.jose.jwk.JWK.parseFromPEMEncodedObjects(). Gson is used for making JSON datagram.
3. Inspect the VaultKeysToJwksCallout class
less $REPO/vault-facade-callout/src/main/java/com/exco/vaultkeystojwks/VaultKeysToJwksCallout.javaWhile this class is a straightforward implementation of com.apigee.flow.execution.spi.Execution interface, two best practices points are worth to be mentioned:
* properties passed to the class contractor have operation parameter which facilitates future extension of the class functionality;
* catch exception block populates the Apigee proxy context with Java error and stack trace to facilitate easier troubleshooting.
4. Build a Java Callout.
cd $REPO/vault-facade-callout
mvn package
5. Copy the built jar file into a destination location of the java resources folder of the vault-facade-proxy.
mkdir -p $REPO/vault-facade-proxy/apiproxy/resources/java
cp  $REPO/vault-facade-callout/target/vault-keys-to-jwks-0.0.1.jar $REPO/vault-facade-proxy/apiproxy/resources/java
Vault Facade Proxy: Login Conditional Flow, Generate and Sign JWT Id Token Proxy
The Vault Facade API proxy implements to request resource endpoints /jwks and /login as conditional flows.
The policies for /jwks are displayed below.

The policies for /login are:

Yellow areas are the differences between two execution paths, corresponding to the conditional flows.
1. Now that the prerequisite objects of the proxy are deployed, we can deploy the proxy bundle
cd $REPO/vault-facade-proxy
sackmesser deploy --googleapi -o "$APIGEE_X_ORG" -e "$APIGEE_X_ENV" -t "$TOKEN" -d "$REPO/vault-facade-proxy"
Vault Facade Proxy: Proxy Tour
1. We can now open the proxy editor's DEVELOP tab and look around.
The default target uses reference to the Target Server object VaultServer and defines the path as /vault-mock/v1/transit/{vault-path}. This allows for a DRY re-use of the same backend for different operations we want to run against Vault Transit Engine.
    <HTTPTargetConnection>
        <LoadBalancer>
            <Server name="VaultServer"/>
        </LoadBalancer>
        <Path>/vault-mock/v1/transit/{vault-path}</Path>
    </HTTPTargetConnection>
We drive this decision in conditional flows pipelines Assign Message to substitute the {vault-path} variable to keys/sign-key for /jwsk basepath suffix or to sign/sign-key for /login suffix.
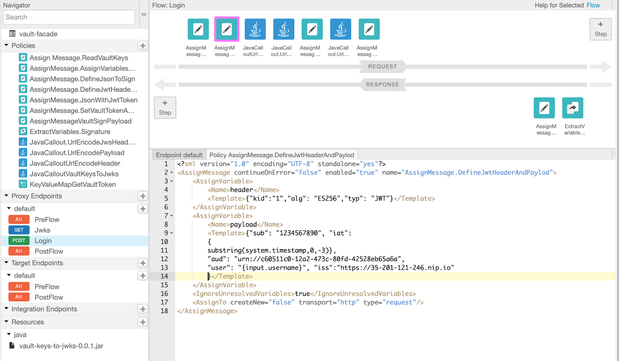
In the AssignMessage.DefineJwtHeaderAndPayload policy we use the substring(system.timestamp) expression to generate a second part of the current timestamp.
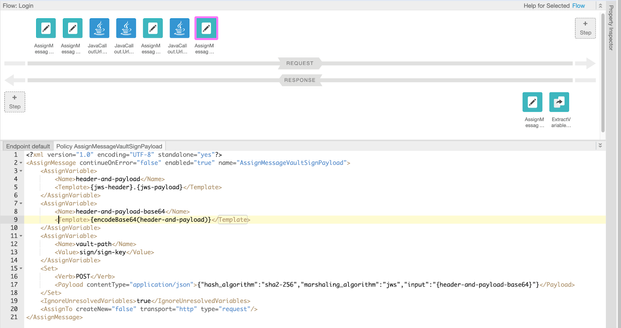
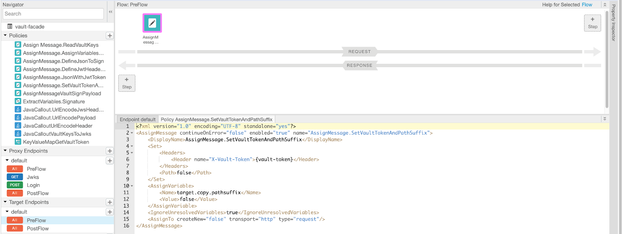
Two points to observe in the AssignMessage.SetVaultTokenPathSuffix:
1. The Header element injects a vault token needed to authenticate the request with the Vault server.
NOTE: https://developer.hashicorp.com/vault/docs/auth/token
The token is set directly as a header for the HTTP API. The header should be either X-Vault-Token: <token> or Authorization: Bearer <token>.
2. AssignVariable element turns off target.copy.pathsuffix context variable. This prevents automatic copying of the request path suffix and lets us explicitly control the generated path of the requests sent to Vault server.
Note that the sackmesser deploy operation does both tasks, importing the proxy bundle into an Apigee organization and deploying the proxy into an environment that contains the defined VaultServer and vault-config KVM.
Vault Facade Proxy: Test requests
1. Use curl to request the JWKS datagram:
curl https://$APIGEE_X_HOSTNAME/vault-facade/jwksSample output:
{
  "keys": [
    {
      "kid": "1",
      "kty": "EC",
      "crv": "P-256",
      "x": "i5_DX1VZn...rCHJk",
      "y": "qaYrjldDY...dUCeWmivU0"
    }
  ]
}
2. Use curl to get ID JWT token in exchange for the user credentials
curl -H "Content-Type: application/x-www-form-urlencoded" https://$APIGEE_X_HOSTNAME/vault-keys-to-jwks/login -d "username=user&password=pass"Sample Output:
{
  "jwt-token": "eyJraWQiOi...JZ5Uzn3sxNw"
}
3. Use jwt.io to insert a jwt token and a public key and verify that the signature is valid.
SECURITY-NOTE: In proxy, use private. prefix for a vault token context variable to mask the value in the DEBUG interface.
OPTIMISATION-TODO: cache jwks to avoid Vault fetch and generation. invalidate cache when updating the KVM value
OPTIMISATION-TODO: trigger cache expiry event when rotating the secret
Vault-Mock Proxy: Code repository, CI/CD
The code for this solution is located at https://github.com/yuriylesyuk/devrel/tree/main/references/hashicorp-vault-integration.
The pipeline.sh is the script that drive the setting up of the solution for two scenarios:
- a real Vault server;
- a mock Vault server.
This is driven by the SKIP_MOCKING environment variable. The configuration is abstracted out in a collection of environment variables:
| APIGEE_X_ORG | Apigee X or Hybrid organization name |
| APIGEE_X_ENV | Apigee environment name |
| APIGEE_X_HOSTNAME | the hostname that services Apigee API requests |
| SKIP_MOCKING | empty for mocking deployments, any value for non-mocking scenarios. This convention is driven by the convenience of the CI/CD process |
| VAULT_HOSTNAME | hostname of the server that serves Vault requests. For the mocking scenarios, the assumption is that the Vault mock proxy is deployed in the same Apigee env/organization |
| VAULT_PORT | the HashiCorp Best Practice is to use 8200 whenever possible. If Vault is configured behind an L7 Load Balancer, you are likely to use 443 |
| VAULT_SSL_INFO |
HTTP Target Connection's SSL Info configuration object |
| VAULT_TOKEN |
In this article we assume the VAULT_TOKEN is stored in KVM. In a production environment, you would interact with the Vault server via an authentication process to limit the service attack at this token |
There are two configuration points to switch between mock backend and Vault server backend. The first one is the VAULT_* variables configuration documented above. The second one is to adjust the path of the Target server. For a Vault server backend, the path usually will be the one that is provided by the code. Yet for a mock server, as it will be deployed as another proxy in a same org/env, we would need to tweak the XML file with a target configuration to prepend a proxy basepath that the mock server exposes. A simple awk one-liner does this job:
TARGET_SERVER_DEF="$SCRIPTPATH/$VAULT_PROXY/apiproxy/targets/default.xml"

echo "$(awk  '/<Path>/{gsub(/<Path>/,"<Path>/vault-mock");print;next} //' "$TARGET_SERVER_DEF" )" > "$TARGET_SERVER_DEF"
BDD: Integration Tests
We are using apickli OSS project for behavior-driven development tests. We added additional steps to facilitate JWT-related testing:
'I store JWKS in global scope'
-- gherkin allows to store a JWKS response in a global scope so that it can be used for JWT signature checking.
/^I decode JWT token value of scenario variable (.*) as (.*) in scenario scope$/
-- used to decode the tripartite base64url-encoded JWT token to its JSON representation and store it in a scenario-scope variable
/^scenario variable (.*) path (.*) should be (.*)/
-- this gherkin re-implements an ability to use JSON Path expressions against a variable stored in a scenario scope.
/^value of scenario variable (.*) is valid JWT token$/
-- this gherkin executes JOSE JWT verify() method that validates integrity of a JWT token by validating it and doing extra checks, like time-to-leave.

 Twitter