This website uses Cookies. Click Accept to agree to our website's cookie use as described in our Privacy Policy. Click Preferences to customize your cookie settings.
Turn on suggestions
Auto-suggest helps you quickly narrow down your search results by suggesting possible matches as you type.
Showing results for
- Google Cloud
- Articles & Information
- Cloud Product Articles
- Configure Logging using the GCP Stackdriver Extens...
Topic Options
- Subscribe to RSS Feed
- Mark as New
- Mark as Read
- Bookmark
- Subscribe
- Printer Friendly Page
- Report Inappropriate Content

 LinkedIn
 Twitter
davidafreeman
New Member
Topic Options
- Article History
- Subscribe to RSS Feed
- Mark as New
- Mark as Read
- Bookmark
- Subscribe
- Printer Friendly Page
- Report Inappropriate Content
0
0
1,006
Apigee comes with a number of Extensions bundled into the Apigee SaaS product, which allows you to easily and securely connect to backend services out-of-the-box.
Here we will look at configuring the Logging service from Google Cloud (formally known as Stackdriver) so that it can be used in your API Proxy. Apigee already have a good tutorial (https://docs.apigee.com/api-platform/tutorials/add-extension/intro), and this article adds a little more insight to setting it up.
This instruction will go through the following;
- Set-up of GCP Logging to enable it for Apigee API Proxies.
- Set-up of the Google Stackdriver Logging extension in Apigee.
- Configuration of an API Proxy to use the new extension.
Pre-requisites
You should have the following services with administrator access;
- Apigee SaaS
- A GCP project environment
1. Set-up GCP Logging
To get ready for connecting your GCP logging service we’ll need to get a service account, a private key and a logging bucket (optional).
- After logging into the GCP Console, go to IAM > Service Accounts > Create Service Account
- Once created, in your new service account Add Key > Create New Key. Once created by sure to store your key file somewhere safe, and DO NOT share your key, or store it in the clear. We will use this key later when setting up the Apigee extension.
- Add the “Logs Writer” role as a permission to the service account under IAM > your service account > Edit > Add Role for “Logs Writer”
- OPTIONAL: Set-up a new logs bucket for your API to log to. This will make it easier to deal with the Logs specific to your API, or application. Go to Logging > Logs Storage > Create logs bucket


Great work, now you have a valid service account with the right access to your Logging service, and an optional log bucket for where your API logs will appear.
Next, we will use your service account private key file to set-up the Apigee Google Stackdriver Extension.
2. Set-up Google Stackdriver Extension
When configuring your Logging extension you can select various GCP projects to connect to, or sets of credentials to connect with, for each of your Apigee environments. This helps ensure a good separation between Dev, Test and Production environments, and is therefore a good practice to follow.
- Log into Apigee Edge, go to Admin > Extensions > Add Extension > Google Stackdriver Logging
- Enter your GCP Project ID (you can view this in the GCP console in the pull down, a pop-up will appear with your project ID, or simply view this in the GCP Console Home screen).
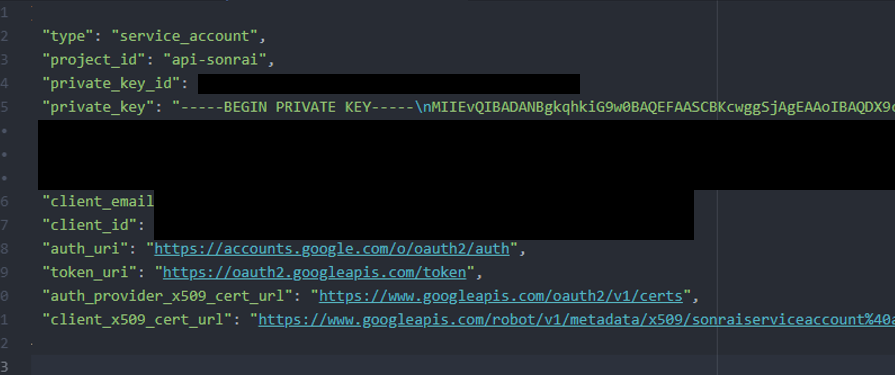
- Enter your Credentials, which is the Private Key file you saved for your GCP Service Account (if you’ve lost the file you’ll need to generate a new key and file, as you cannot recover a lost key). To enter the private key correctly in the Credentials field, you’ll need to open the key file and copy the whole JSON into the credentials field (including the curly braces { } );
- Hit “Save”.
- Then click “Deploy” on the environment you just configured to enable that environments configuration. This will take a few minutes as indicated below, and finally after a few minutes it will come up as “Deployed”.
- Check the Extension logs to see if you were able to connect successfully. They should look something like this;


Troubleshooting extension access issues to GCP Logging: If you see something like a 403 error, there are a few things to look into;
- Incorrect credentials - try your credentials again, remembering to copy the whole JSON in.
- Invalid key - Check your API key is valid. Look at the “private_key_id” in the key file and compare that to the matching Service Account in Google IAM to see that it exists under your service account and is not expired.
- Invalid service account - make sure you’re using a valid service account (e.g. not the Google Storage Service Account or any other type). I have seen a corrupt/buggy service account before, this may mean you may need to create a new service account.
- Incorrect role - make sure that the role “Logs Writer” is added to the service account.
We are now ready to set-up our API Proxy to start logging through to GCP Logging.
3. Configure your API Proxy to use the Logging Extension
- In Apigee Edge, go to Develop > API Proxies > your proxy > Develop tab.
- Add an Extension Callout policy, fill in the Name, Extension to use and the Action.
- Configure your Policy with the details you need to log, including any variables you’d like to log (see https://docs.apigee.com/api-platform/reference/policies/extension-callout-policy for more details). The the “logName” you can use the name of the logging bucket you set-up earlier.
Here’s a basic <Input> element sample you can use to get started;
<Input><![CDATA[{ "logName": "<YOUR LOGGING BUCKET, OR LOG NAME>", "metadata": { "resource": { "type": "global", "labels": { "project_id": "<YOUR PROJECT ID>" } } }, "message": "This is a test. Client IP: {client.ip}. Proxy name: {apiproxy.name}" }]]></Input> - Add the policy to your PreFlow, PostFlow, or if you can your PostClientFlow (recommended).
- Once you’ve configured your policy correctly, you will start getting logs through to Google Cloud Logging like the one below;

Using PostClient Flow: The newer versions of the Stackdriver Extension (1.3.7 and above) support the Extension Callout policy in the PostClient Flow. This is exceptionally handy as the executing of this policy doesn’t impact the operation of the API call.
Although to use this policy in your PostClient Flow (recommended), if you are an Apigee Edge SaaS user, you must contact Apigee Support to ensure that the features.allowExtensionsInPostClientFlow flag is set to true in your organization.
If possible, try to use the policy in the PostClient Flow, as including this policy in the PreFlow or PostFlow has 2 drawbacks;
- It will impact the latency of your API.
- Any problems with your GCP-Logging back-end may cause your API to enter an error-state and prevent users from using your API. In this case you will want to ensure the continueOnError attribute on the policy is set to true. Even so, you will still have problems with your API if the logging backend times-out for any reason.
Policy configuration errors: When configuring your Extension Callout policy, it can take time to ensure the <Input> element is provided in the right format. This is also where the Extension Logs (under the Extensions section) will provide you insight into what you may have misconfigured to allow the logs to get through correctly, for example;
Request #rrt-4399607931465410065-a-gsy1-15826-234961-1 - Status 400 - Error thrown: SyntaxError: Unexpected tokenorin JSON at position 482
If you’ve got any questions please let me know at david.freeman@sonrai.com.au.
Happy Logging!
References
Topic Labels