This website uses Cookies. Click Accept to agree to our website's cookie use as described in our Privacy Policy. Click Preferences to customize your cookie settings.
Turn on suggestions
Auto-suggest helps you quickly narrow down your search results by suggesting possible matches as you type.
Showing results for
- Google Cloud
- Articles & Information
- Cloud Product Articles
- Cloud Native API Load Testing
Topic Options
- Subscribe to RSS Feed
- Mark as New
- Mark as Read
- Bookmark
- Subscribe
- Printer Friendly Page
- Report Inappropriate Content

 LinkedIn
 Twitter
strebel
Staff
Topic Options
- Article History
- Subscribe to RSS Feed
- Mark as New
- Mark as Read
- Bookmark
- Subscribe
- Printer Friendly Page
- Report Inappropriate Content
3
0
1,246
With the large number of policies readily available for customizing API flows and the flexibility of using general purpose programming languages to implement arbitrary functionality it is important to have load testing capabilities as part of every API program. Load tests should provide a painless way for both the API product team as well as the API developers to validate implementations and architectural design decisions.
The goal of this blog post is to present an overview of different tools available for load testing APIs and measuring end-to-end latency from a consumer perspective. It also includes examples for how to automatically generate load with varying levels of complexity.
Disclaimer: The latency numbers displayed in the examples are highly dependent on the network characteristics, the actual proxy implementation as well as the underlying backend services. The numbers displayed in this are therefore only for illustrative purposes and cannot be used as an indication of what to expect in your specific scenario. Please also note that load generated in load tests counts against your Apigee call quotas.
What to test?
Before you start load testing, it is important to get an understanding of the API you want to analyze and the business expectations around them. Important factors might include:
- What is an observed/expected call volume (# calls per second/minute)?
- What is the observed/expected number of concurrent users?
- What variations in payloads, tokens, paths, headers are observed/expected?
Independent of the deployment model we are interested in the overall latency of our calls as well as their distribution. Another important metric to consider is the throughput of the overall system. For deployment models where the runtime is controlled by the customer (i.e. Hybrid and Private Cloud), resource utilization at the different runtime components like Cassandra and the message processors are also important aspects to consider and potentially optimize based on the results of the load test.
To better understand the overall system behavior, you should perform load tests against the API proxy as well as directly against the backend system. Depending on the latency distribution between the backend and the API proxy different mitigation approaches can be applicable.
Additional considerations for performing load testing on Apigee can be found in the Apigee FAQ and this comment by Dino in the Apigee Community.
When to do load testing?
Load tests should be performed in order to validate assumptions with respect to how your system performs under different usage scenarios. Particularly changes to the API proxy can have an impact on the overall performance which can easily be overlooked during implementation. For larger changes to API proxies it is therefore a good practice to conduct load tests before and after the changes are deployed. This way, performance regressions can be detected early on and it is easier to attribute them to the respective change.
As described above, the characteristics of the load test need to be determined with respect to the business requirements of the API. These characteristics should be monitored and compared against the observed traffic in your production and pre-production environments. It is recommended to adapt the load test characteristics if you expect additional traffic spikes (e.g. Blackfriday or Diwali) or see your sustained traffic approach the levels in your load tests.
What tools are available?
The following list represents a list of the most commonly used tools for API performance testing:
- Apache Bench (ab) is a command line tool which originated from the Apache HTTP server project. It can be used to quickly generate load against an API endpoint with the addition of some basic parameters.
- Hey is designed as a replacement for Apache Bench with some additional capabilities.
- Fortio is istio’s load testing tool. It can be used as a command line tool or docker container. It offers some basic configuration parameters to generate HTTP or GRPC traffic.
- Wrk is a another HTTP benchmarking tool aimed to generate load with explicit control over the number of threads and open connections used. Custom request generation or response analytics is possible via custom Lua script extensions.
- Locust is a Python-based load testing tool. It is mainly focused on generating HTTP traffic but can be used to generate other kinds of traffic using additional python libraries. Performance tests are script based and can be executed headless or in a web UI.
- Gatling is a Scala-based performance testing suite. Gatling can be used at various layers of abstractions from browser recording and a Domain Specific Language (DSL) to the flexibility of the full Scala programming language.
- K6 is another scriptable load testing that is offered as both open source and SaaS. While the platform is written in go, the load tests are written in JavaScript. A range of integrations with common visualization tools is also provided.
Simple Load Generator
In this example we want to look at how to use Fortio to quickly generate load against a simple API proxy. Note that we are using the dockerized Fortio distribution to simplify our setup and encapsulate the test.
docker run fortio/fortio load https://APIGEE_ORG-ENV.apigee.net/load-test/v0/airports?apikey=XXX
In the output of this run you will see a distribution of the response latencies which includes the round trip via the internet to the API Gateway and is therefore oftentimes significantly higher than what you would see in the Apigee trace tool.
# target 50% 0.162857# target 75% 0.177143# target 90% 0.2# target 99% 0.20507# target 99.9% 0.205577
Apart from the latencies you also see the summary of the HTTP response codes
Code 200 : 40 (100.0 %)
Scripted Load Generator
For simple load generators to quickly validate an implementation or generate traces tools like Apache Bench, HEY, or Fortio are oftentimes sufficient.
More elaborate scenarios however require the possibility to add additional logic via either configuration or a general purpose programming language. Examples for why scripted load tests could be necessary include:
- Sophisticated login flows like OAuth2
- More realistic user interactions including variations in timing, payload sizes and number of calls
- Mocking of third party systems
- Tighter control over execution parameters
For our demo example we simulate a user interaction with the API consisting of two sequential steps
- The user retrieves a list of resources
- The user picks a randomly selected resource from that list and retrieves it
# locust.py

import os
import random
from locust import HttpUser, task, constant, SequentialTaskSet

apikey = os.environ.get('APIKEY')

class AirportBrowserSequence(SequentialTaskSet):

   airportCodes = []

   @task
   def list_all(self):
       r = self.client.get("/airports?apikey={}".format(apikey), name="/airports")
       self.airportCodes = r.json()


   @task
   def list_individual(self):
       iata = random.choice(self.airportCodes)['iata']
       self.client.get("/airports/{}?apikey={}".format(iata, apikey), name="/airports/[IATA]")

class AirportLoad(HttpUser):
   tasks = [AirportBrowserSequence]
   wait_time = constant(1)
Just as before, we are running our tests in a container such that it runs in isolation with all the dependencies packaged. To run this test, execute the following command from within the directory of your locust file:
docker run -p 8089:8089 -e APIKEY=$APIKEY -v $PWD:/mnt/locust locustio/locust -f /mnt/locust/locustfile.py -H https://APIGEE_ORG-ENV.apigee.net/load-test/v0
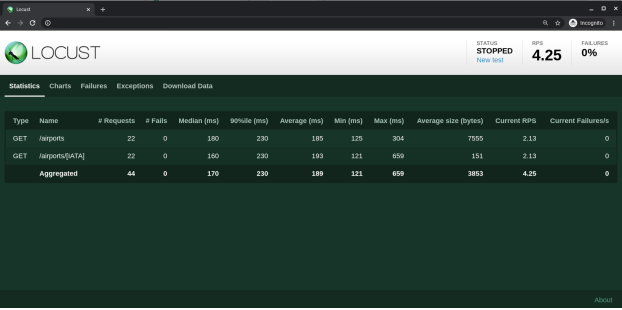
If you then open your web browser at http://localhost:8089 you will see a dialog prompting you for the number of concurrent users as well as the hatch rate. Select these values according to your use case and start your load test.
Hint: Let the load test run for a bit to avoid capturing the warm-up latency and then clear your captured statistics for your actual measurements.
The measured performance metrics can be observed in either table or graphical form. For archival or comparison purposes, one can also export the data.

Distributed load testing in Kubernetes
For scenarios, where one single execution node is not enough, the Locust-based example presented above can also be configured to run on a distributed worker pool. This example shows how to run a distributed Locust setup on Kubernetes because it not only simplifies the deployment and scaling of the worker pool but also nicely integrates with other Kubernetes-based workloads such as the new Apigee hybrid runtime. A more generic description of how to perform load tests using Google Kubernetes Engine can be found here.

To turn our local dockerized load test into a kubernetes workload we first need to create a Kubernetes configmap to hold our Locust configuration.
kubectl create configmap locust-config --from-file ./locustfile.py
And then create the deployments for our controller and worker pods as well as the service to expose the controller for the workers.
apiVersion: apps/v1
kind: Deployment
metadata:
 name: locust-master-deployment
 labels:
   app: locust
   app-role: master
spec:
 replicas: 1
 selector:
   matchLabels:
     app: locust
     app-role: master
 template:
   metadata:
     labels:
       app: locust
       app-role: master
   spec:
     containers:
     - name: locust
       image: locustio/locust
       command: [ "/usr/local/bin/locust" ]
       args: [ "-f", "/mnt/locust/locustfile.py", "--master" ]
       env:
       - name: LOCUST_USER
         valueFrom:
           secretKeyRef:
             name: locust-credentials
             key: user
       volumeMounts:
       - name: locust-config-volume
         mountPath: /mnt/locust/
       ports:
       - name: master-web
         containerPort: 8089
         protocol: TCP
       - name: master-int
         containerPort: 5557
         protocol: TCP
       resources:
           limits:
             memory: 256Mi
             cpu: 200m
     volumes:
     - name: locust-config-volume
       configMap:
         name: locust-config
---
apiVersion: apps/v1
kind: Deployment
metadata:
 name: locust-worker-deployment
 labels:
   app: locust
   app-role: worker
spec:
 replicas: 5
 selector:
   matchLabels:
     app: locust
     app-role: worker
 template:
   metadata:
     labels:
       app: locust
       app-role: worker
   spec:
     containers:
     - name: locust
       image: locustio/locust
       command: [ "/usr/local/bin/locust" ]
       args: [ "-f", "/mnt/locust/locustfile.py", "--worker", "--master-host", "locust-master" ]
       volumeMounts:
       - name: locust-config-volume
         mountPath: /mnt/locust/
       ports:
       - name: master-web
         containerPort: 8089
         protocol: TCP
       - name: master-int
         containerPort: 5557
         protocol: TCP
       resources:
           limits:
             memory: 128Mi
             cpu: 100m
     volumes:
     - name: locust-config-volume
       configMap:
         name: locust-config
---
kind: Service
apiVersion: v1
metadata:
 name: locust
 labels:
   app: locust
   app-role: master
spec:
 ports:
   - port: 8089
     targetPort: master-web
     protocol: TCP
     name: master-web
   - port: 5557
     targetPort: master-int
     protocol: TCP
     name: master-int
 selector:
   app: locust
   app-role: master
 type: LoadBalancer
To access the locust web UI you can either expose the service as a LoadBalancer or simply use kubectl to proxy your local port:
kubectl port-forward --address 0.0.0.0 service/locust-master 8089:8089
Conclusion
Load testing is a necessary tool for every API team in order to better understand the performance implications and limitations of their APIs and overall system landscape. We have seen different approaches to generate load against an API at various levels of granularity. Planning a load test is almost always an interdisciplinary effort and should include stakeholders from across the organization to make sure technical as well as business requirements are met.
Topic Labels